Steps To Create a Gmail Account For a Website

You will get a free 10GB storage to save all your emails no matter how loaded they may be with rich media. 
Follow these easy steps:
  1. Go To Google Apps for Domains
  2. Submit your website address without typing http://
  3. Then fill up the vacant blanks with required information. Keep your username simple because this will be attached to your domain name to create your custom Gmail account username. In my case I choose Mohammad for my sister blog.
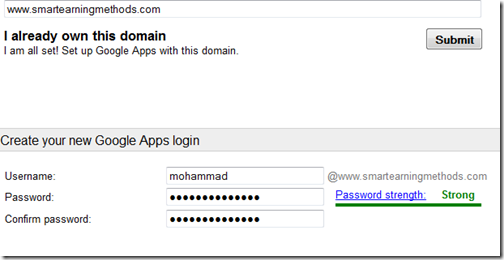
setup email with googleapps
      4.  Keep Alternate email address the same as your personal Gmail ID or any ID  that you use frequently.
      5. Click the submit button to create your account

      6. You have now successfully created an account with Google apps. Now you need to verify that you actually own the domain. You will be given two options Express and Custom. Choose express.
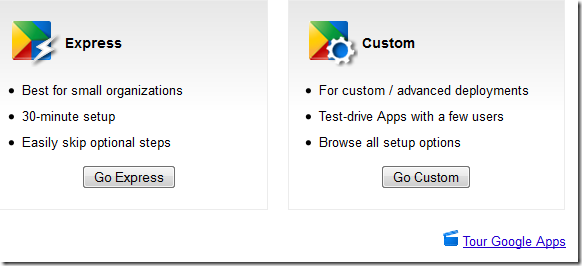
express and custom googleapps
   7.   Click the next buttons till you get to Domain verification page. Here you get 5 options to verify your domain which are:
  1. Upload HTML File      (Recommended Method)
  2. HTML Tag            (under alternate Methods tab)
  3. Google Analytics       (under alternate Methods tab)
  4. Domain Name provider       (under alternate Methods tab)
Choose the second option of HTML Tag because it is the easiest of all. Copy the simple Meta tag and paste it inside your template just below <head> section. 
Tip for Genesis Users: 
Once done, hit the verify button and you are half done. 
domain verified
Click the continue link and you will be taken to Google Apps Setup wizard. You may keep all options default and keep clicking next till you reach setup Gmail:
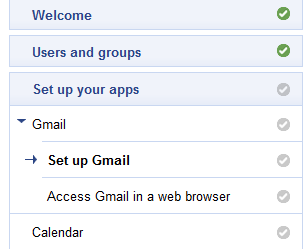
set up gmail
Choose other from the drop down box which says "Choose your Host" Click Next
Setting up MX Records
Here you will be given four MX entries that you need to submit to your webhost. 
MX records
You will need to log into your web host account and navigate to DNS Manager or DNS settings. DNS zone is also called DNS ManagementMail Server Configuration, or Name Server Management, depends on your webhost. I will be sharing here the settings for hostgator here which will give you a clear observation on what to do.
Setting For HostGator:
  1. Log in your Control Panel
  2. Click the MX entry icon just under Mail
  3. Choose your domain
  4. Set Email routing to Automatically Detect Configuration
  5. Now enter 5 MX entries one by one inside the Records box.  These MX entries are given to you by Google apps. While entering the destination remove the dot in the end. For example ASPMX.L.GOOGLE.COM. should be entered as ASPMX.L.GOOGLE.COM
MX entry hostgator
     5.  When everything has been entered correctly it will look like this:
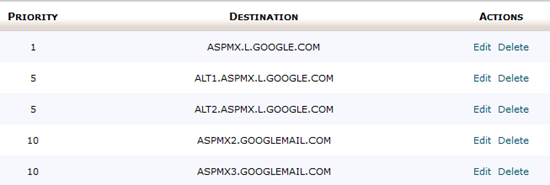
MX entries for googleapps
Note: If an MX entry exists by default, you may delete it and keep only the above 5 MX entries. It will take 24 hours for your Email to connect to Google servers so be patient
Go back to Google apps and keep on clicking next till you complete the wizard. Though completing the setup wizard is not necessary but to avoid the irritating prompting messages better complete it. 
Congratulations! You have now successfully created a custom Gmail address for your website.
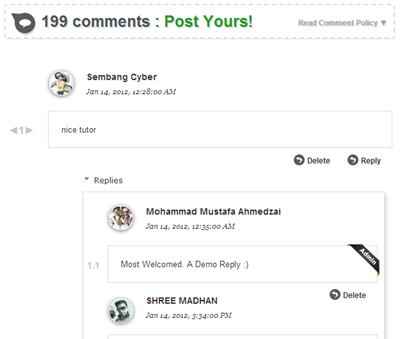
#1: Fancy Blogger Threaded Commenting System

Fancy blogger threaded comments
Ah! I loved this. One of the finest creation of MBT and Mohammad. Threaded comments add breath to your comments which makes it more appealing and gives an easy look who is talking to whom. Shows users and Admin in different highlighted style and contains automatic comment counts also! 
Install Now!

#2: Table of Contents

table of contents for blogger
Google is just 50% boss! So, after you have successfully created sitemap for robots, why not create a sliding dropdown sitemap for your users too? Give them user friendly experience while browsing through your site! 
Install Now!

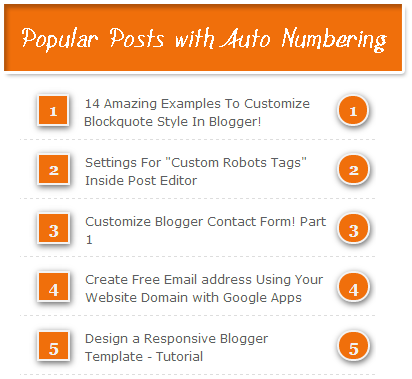
#3: Popular Posts with Counter!

auto numbered popular posts
Popular posts serve your users best way to navigate through trending articles on your website. And when the widget is styled by MBT, then who dares not to visit your posts? :) Grab this cool widget through the link below! 
Install Now!

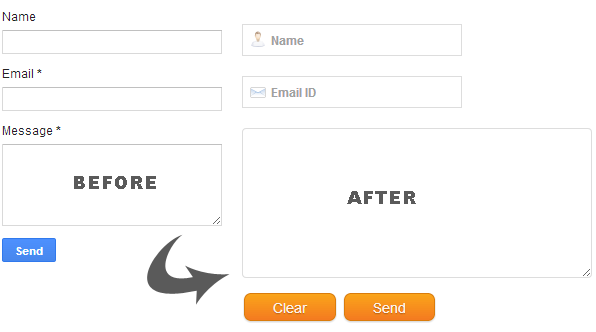
#4: Contact Form

custom blogger contact form
There you go. A way users can use to contact you without giving out your email id to them. A beautiful contact form is really appreciated. Get going and install this form on your blogger blogs right away...! 
Install Now! [Part 1] 
Install Now! [Part 2] 

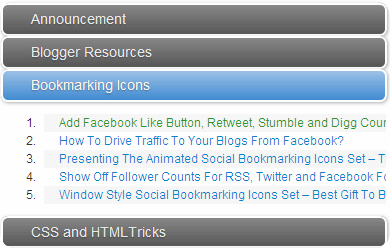
#5: Accordion Dropdown Widget

popular series widget for blogger
This is also a great invention by MBT. A smooth sliding dropdown widget in your footer will sparkle out your whole site. You can place your own links, categories, or anything you want. Useful for display long list of posts or related articles in series. So, what are you waiting for? 
Install Now! 

#6: HootSuite For Blogger

hootsuite for blogger
The popular app HootSuite is launched for Bloggers. So why are you still here guys? Go on and install this cool and useful application to your site as soon as possible! Follow the link:

#7: AdSense Booster Plugin


Adsense Booster
A great plugin developed by STC Network which allows adding your adsense ads right after <!---more--> tag in blogger which breaks your content into some part. This plugin will surely boost your CTR earnings!
Install Now!

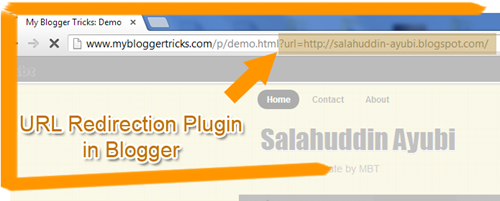
#8: URL Redirection

url redirection
Nice plugin to redirect users to a demo site through your links. Give out a professional feeling and view. Must install plugin if you are on blogger and share downloadable resources. This is trick applied by all Blogger/Wordpress Template Sharing sites to let users stay inside the root domain.
Install Now!

#9: Facebook Activity Feed Plugin

facebook activity for blogger blogs
Yet another great plugin by MBT to inform your users about recent happenings on Facebook around you. Grab it now.
Install Now!

#10: Floating Colorful Navigation Menu

colorful navigation
I liked this one too. Lightweight, easy to load, easy to customize, and 100% working. Designed by Mohammad.  You should give it a try and I guarantee you won't be disappointed with the results!
Install Now!

error unknown filesystem grub rescue

error: unknown filesystem
grub rescue/ set boot=(hd0,msdos5)
grub rescue/ set prefix=(hd0,msdos5)/boot/grub
grub rescue/ insmod normal
grub rescue/ normal
finish

Add Facebook Like Buttons In Blogger

How To Add Facebook Like Button In Blogger?

Follow below steps....
1.open facebook url in first steps shown in fig.
2.Paste your facebook page url which you want to create fb like button.
3.Click on get Code...
add fb like button in blogger id

4.Goto your blogger id.
5.Select layout option.
6.Select Add a Gadget button in shown in fig.
add gadgets in blogger

7.Select HTMP/Javascript option shown in below fig.
select html/javascript option in blogger

8.Paste you iframe Facebook code like shown in fig.
add facebook like button in blogger
html javascript option

9.Save it and you have done...

Add Facebook Comments System In Blogger

How To Get Facebook App ID?

This tutorial divided in some steps you need just follow these steps giving below.

  • First Go to Facebook Developers Page
  • Give you app name as your site title name etc and click on continue button as showing below

  • Now fill security check captcha   and then continue
  • Now you go on a new page here you can see your app id and we need it in next steps


How To Add Facebook Comments In Blogger?

  • First go to Blogger > Template > Edit HTML
  • Now search for <html  and just after it give a space and paste the below code
xmlns:og='http://ogp.me/ns#
  • Now search for <body> tag and just below it paste the following code
<div id="fb-root"></div>
<script>
window.fbAsyncInit = function() {
FB.init({
appId : 'YOUR_APP_ID',
status : true, // check login status
cookie : true, // enable cookies to allow the server to access the session
xfbml : true // parse XFBML
});
};
(function() {
var e = document.createElement('script');
e.src = document.location.protocol + '//connect.facebook.net/en_US/all.js';
e.async = true;
document.getElementById('fb-root').appendChild(e);
}());
</script>
  • Replace YOUR_APP_ID  with your Facebook Application ID 
  • Now search for </head> and just above it paste the below code
<meta property="fb:app_id" content="YOUR_APP_ID" />
  • Replace YOUR_APP_ID with your Facebook Application ID
  • Now search for  <b:includable id='comment-form' var='post'>  just after it paste the below code
<b:if
cond='data:blog.pageType == "item"'>
    <div
    style='padding:20px 0px 5px 0px; margin:0px 0px 0px 0px;'>
        <script
        src='http://connect.facebook.net/en_US/all.js#xfbml=1'
        />
        <div>
            <fb:comments
            colorscheme='light'
            expr:href='data:post.url'
            expr:title='data:post.title'
            expr:xid='data:post.id'
            width='550'
            />
        </div>
                </div>
                </b:if>
  • Now click on Save Template button and you are done !
  • Now you have successfully added Facebook Comments System in Blogger for result check preview of your site
If you like our tutorial then please share with your friends and give me your feedback via comments Take Care ! - See more at: http://www.googleagra.com

Add Beautiful Popular Posts Widget In Blogger

Beautiful Popular posts Widget For BloggerPopular posts widget is also in blogger widgets   as default but to give it a new look you need to   make some changes in CSS coding. Today we   are providing a beautiful popular widget for   blogger which have a great look and have an    awesome hover effect. Popular posts widget is in   your blogger right side and also make a attention   for a visitor to add this widget you can make a   good impression on your visitor so when visitors   show these posts and if like on of them then the   visitor surely click  on it and this visitor become   your loyal reader. So for this cause we providing   Popular Posts widget for Blogger it also make a professional look for your template. - See more at: http://www.googleagra.com

How To Add Popular Posts Widget In Blogger?

To add This widget in Blogger you need to follow these simple steps:-
  • First Go To Blogger > Layout
  • Click on Add A Gadget
  • Now Click on Popular Posts widget and make the follow changes as showing in picture
  • popular

  • Make the same changes as shown above in picture
  • And Click on Save Button
  • Now the second part is add the CSS code for this
  • Go To Blogger > Template
  • Click on Edit HTML

popular 2
  • Click on Black Arrow to expand the coding
  • Now search </b:skin> using ctrl+f
  • Above </b:skin> paste the following code
/*--- MBW Popular Posts --- */
.popular-posts ul{padding-left:0px;}
.popular-posts ul li {background: #FFF url(http://1.bp.blogspot.com/_7wsQzULWIwo/S
modosCuJCI/AAAAAAAABh4/ZSXbVW9Qpa8/s400/261.gif) no-repeat scroll 5px 10px;
list-style-type: none;
margin:0 0 5px 0px;
padding:5px 5px 5px 20px !important;
border: 1px solid #ddd;
border-radius:10px;
-moz-border-radius:10px;
-webkit-border-radius:10px;
}
.popular-posts ul li:hover {
border:1px solid #6BB5FF;
}
.popular-posts ul li a:hover {
text-decoration:none;
}
  • Now click on Save Template and you are done !
If you need any kind of help then please leave a comment Take Care ! - See more at: http://www.mybloggerwidgets.com/2013/10/add-beautiful-popular-posts-widget-in.html#sthash.Fv1tNyJY.dpuf

Add Do You Like This Story Widget Below Every Post

Welcome again to all Friends as i already provided Social Media Sharing widget and also Flipper Sharing widget for Blogger, For many requests today i am showing you how to add Do You Like This Story Widget for Blogger. - See more at: http://www.googleagra.com/

How To Add Do You Like This Story Widget In Blogger?

To install this widget in blogger you need to following these simple steps:-

  • Go to Blogger > Template > Edit HTML
  • Search for <data:post.body/>  using CTRL+F
  • Now paste the following code below it
<b:if cond='data:blog.pageType == &quot;item&quot;'> 
<style> 
form.emailform{ 
margin:20px 0 0; 
display:block; 
clear:both; 

.mbwtext{ 
background:url(http://3.bp.blogspot.com/-SoB4RN7Bchk/TZ1ouay9q0I/AAAAAAAAAlE/dkyZEzF2
HIw/s28/w2b-mail.png) no-repeat scroll 4px center
transparent; 
padding:7px 15px 7px 35px; 
color:#666; 
font-weight:bold; 
text-decoration:none; 
border:1px solid #D3D3D3; 
-moz-border-radius: 4px; 
-webkit-border-radius: 4px; 
border-radius: 4px; 
-moz-box-shadow: 1px 1px 2px #CCC inset; 
-webkit-box-shadow: 1px 1px 2px #CCC inset; 
box-shadow: 1px 1px 2px #CCC inset; 

.mbwbutton{ 
color:#666; 
font-weight:bold; 
text-decoration:none; 
padding:6px 15px; 
border:1px solid #D3D3D3; 
cursor: pointer; 
-moz-border-radius: 4px; 
-webkit-border-radius: 4px; 
-goog-ms-border-radius: 4px; 
border-radius: 4px; 
background: #fbfbfb; 
background: -moz-linear-gradient(top, #fbfbfb 0%, #f4f4f4 100%); 
background: -webkit-gradient(linear, left top, left bottom, color-stop(0%,#fbfbfb), color-stop(100%,#f4f4f4)); 
background: -webkit-linear-gradient(top, #fbfbfb 0%,#f4f4f4 100%); 
background: -o-linear-gradient(top, #fbfbfb 
0%,#f4f4f4 100%); 
background: -ms-linear-gradient(top, #fbfbfb 0%,
#f4f4f4 100%); 
filter: progid:DXImageTransform.Microsoft.gradient( startColorstr=&#39;#FBFBFB&#39;, endColorstr=&#39;#F4F4F4&#39;,GradientType=0 ); 
background: linear-gradient(top, #fbfbfb 0%,#f4f4f4 100%); 

#doulike-outer { 
-moz-border-radius: 10px 10px 10px 10px; 
-webkit-border-radius: 10px 10px 10px 10px; 
-goog-ms-border-radius: 10px 10px 10px 10px; 
border-radius: 10px; 
background: none repeat scroll 0 0 transparent; 
border: 1px solid #D3D3D3; 
padding: 8px; 
-moz-transition: all 0.3s ease-out; 
-o-transition: all 0.3s ease-out; 
-webkit-transition: all 0.3s ease-out; 
-ms-transition: all 0.3s ease-out; 
transition: all 0.3s ease-out; 
width:480px; 

#doulike-outer:hover{ 
background: none repeat scroll 0 0 #FFF; 
-moz-box-shadow: 1px 1px 2px #CCC inset; 
-webkit-box-shadow: 1px 1px 2px #CCC inset; 
box-shadow: 1px 1px 2px #CCC inset; 

#doulike-outer td{ 
padding:3px 0; 

</style> 
<div id='doulike-outer'> 
<div id='doulike'> 
<table width='100%'> 
<tbody> 
<span style='font-style: italic; font-size: 30px; font-family: arial,sans-serif, verdana;  color:#FF683F;'>Do you Like this story..?</span> 
<tr> 
<td> 
<div id='fb-root'/><script src='http://connect.facebook.net/en_US/all.js#xfbml=1'/><fb:like font='' href='' layout='button_count' send='true' show_faces='false' width='300'/> 
</td> 
</tr> 
<tr> 
<td align='left'> <p style='color:#666; font-style:italic; margin:0px 0px 5px 0px; '>Get Free Email Updates Daily!</p> 
<form action='http://feedburner.google.com/fb/a/mailverify' class='emailform' method='post' onsubmit='window.open(&apos;http://feedburner.google.com/fb/a/mailverify?uri=MyBloggerWidgets&apos;, &apos;popupwindow&apos;, &apos;scrollbars=yes,width=550,height=520&apos;);return true' style='margin: 0pt;' target='popupwindow'> 
<input name='uri' type='hidden' value='MyBloggerWidgets'/> 
<input name='loc' type='hidden' value='en_US'/> 
<input class='mbwtext' name='email' onblur='if (this.value == &quot;&quot;) {this.value = &quot;Enter your email...&quot;;}' onfocus='if (this.value == &quot;Enter your email...&quot;) {this.value = &quot;&quot;}' type='text' value='Enter your email...'/> 
<input alt='' class='mbwbutton' title='' type='submit' value='Submit'/> 
</form> 
</td> 
<td><p style='color:#666; font-style:italic; margin:0px 0px 5px 0px;  '>Follow us!</p> 
<a href='http://feeds.feedburner.com/googleagra' rel='nofollow' target='_blank' title='Suscribe to RSS Feed'><img src='http://4.bp.blogspot.com/-GMZCDc-rTEo/Ul1e3h5B_ZI/AAAAAAAAA7U/fUAGzf
FsbUE/s1600/flagrss.png
'/></a> 
<a href='https://twitter.com/uttamsingh121' rel='nofollow' target='_blank' title='Follow us on Twitter'><img src='http://4.bp.blogspot.com/-xuXeIIyW_7k/Ul1e3kYOYBI/AAAAAAAAA7Y/df8L7
ZihYTI/s1600/flagtwitter.png
'/></a> 
<a href='https://www.facebook.com/googleagra' rel='nofollow' target='_blank' title='Follow us on Facebook'><img src='http://2.bp.blogspot.com/-yy7ZUovcX4w/Ul1e3lIvgoI/AAAAAAAAA7k/zdgg0RkaQ
sk/s1600/flagfb.png
'/></a> 
</td> 
</tr> 
</tbody></table></div></div> 
</b:if>

  • Replace Googleagra  with your Feed title
  • Replace Blue color link with your Feedburner link
  • Replace Orange color link with your Twitter link
  • Replace Maroon color link with your Facebook link
  • Now save your template and you are done !
After saving the template preview your site and you can see the changes
Note:-  This widget only shows below your posts not on homepage and give your feedback via comments Take Care !